Monday, October 31, 2011

Festival of Trees 2011 - Petal Cone Potpourri Recipe


My sister Karen has generously agreed to share her original potpourri recipe with everyone. Thank you for patiently waiting while I pulled together photos and such!

Some of you asked if she would sell it ready-made. The answer is yes, for $17/quart. The expensive part of the mix is the essential oils, especially if you're starting with none. We bundles ours in organza scallop circles from the wedding section at the Dollar Tree (25/pkg) and tied with gardener's twine from the Target dollar bin.


Autumn-to-Winter Potpourri

1-2 qts assorted "gatherings" such as:
-small acorns, preferably green*
-seed pods (e.g. Illinois bundleweed, buttonweed)*
-garlic chive flowers*
-1 qt cedar tips with blue & green berries attached*
-1-2 c red rose petals**
-1/2 c hawthorne berries**
-1/4 c whole cloves

Mix gently in large glass (not plastic!) container, then sprinkle over top:

-2 T orris root (binds scent)**
-10-15 drops each essential oils of clove, balsam fir, pine
-20 drops cassia (cinnamon)
-5 drops peppermint
-20 drops cedarwood

Seal container and set to "cure" in dark place about 2 weeks. Makes about 1 gallon.

* Dry ingredients individually before adding. Cedar may be fresh.
**Purchased


Note: Other possible ingredients might include broken cinnamon sticks, tiny pine cones, dried orange peel, straw flower heads, dried statice.

What a great activity to look for "gatherings" while you're on a country walk! You'll see so much more than you ever imagined when you're on the hunt... -Kathy

Friday, October 21, 2011

Festival of Trees 2011- Petal Cones


Each year Lawrence hosts the Festival of Trees, the proceeds of which benefit a local shelter. The Lawrence and Olathe stamp clubs are working to help me create a tree for this event which will then be auctioned to raise funds.

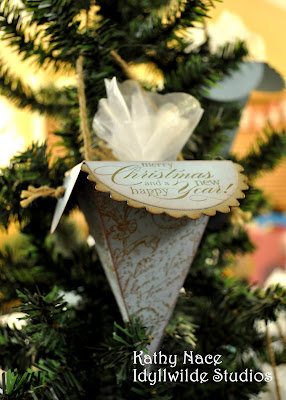
Our first project uses the Petal Cone Die. It's cut from Baja Breeze CS on the Big Shot and then rolled with a vintage wheel for visual texture, then we've added a holiday wish to the flap and sponged the edges. Gardener's twine "dresses it down" to coordinate with the woodsy feel of the entry (each entry has to have a name and a theme).

My sister developed a unique potpourri of local "gatherings" to fill the little organza bundles (she has promised to share the recipe in a future post, so stay tuned!). They smell simply wonderful! As I began to hang them on the tree, I realized there was another obvious use for these beauties: they would be perfect to hang on the posts or backs of chairs, or on doorknobs, or from lamps either as home decor or as a little gift for guests to take along as a memento of tea or dinner at your house.

We'll be making another festival entry project next month, and I'll post viewing times and locations so you can see the finished tree! -Kathy


All Supplies Stampin' Up'! Unless Otherwise Stated

Stamps-Very Vintage (jumbo wheel), Delightful Dozen (sentiment)
Inks- Soft Suede and Crumb Cake classic, Creamy Caramel cartridge (retired)
Paper- Baja Breeze CS
Accessories-Big Shot, Petal Cone die, jumbo stampin' around handle, Sticky Strip, 1/8" handheld punch, Gardener's Twine (Target dollar bins), Organza Scallop Circles (Dollar Tree)

Thursday, October 20, 2011

Stamp Club Olathe - October 2011


Our topic for club this month was a technique I call "Foreground/Background". It's a way to get a whole new look from your stamps, adding dimension without a lot of layers.

The concept works by understanding the way our brains interpret what our eyes see. Things in the distance/background are typically softer, less detailed, faded in color, and smaller; conversely, things in the foreground are crisp, full of detail, brighter, and larger. You can recreate these contrasts by varying your supplies and, in this case, using only part of your stamped image in the "background" to create "smaller" elements, as I've done here using the large pine tree from the set Lovely as a Tree.

You're also seeing "Faux Snow", a mixture of white embossing powder and Dazzling Diamonds applied over Tombow glue for sparkle and dimension. A little touch of Cherry Cobbler in the ink and ribbon gives it "pop". The sentiment is from Delightful Dozen.

Next time you take a walk, pay attention to the differences in how you see what's close at hand, and what is distant. You'll gain a new appreciation for the beauty that surrounds us! -Kathy

Wednesday, October 12, 2011

Holiday Open House Drawing Winner!!


Congratulations to Lara B., our winner in the drawing at the October 1st Idyllwilde Studios Holiday Open House! We hope she enjoys her stamps and rub-ons.

We also want to thank each one of you for stopping by - we had a great time, and hope you did too. Those of you who ordered holiday designer series paper at the event will find an instruction sheet with pattern for the snowman soup bottles pictured above, including the recently-perfected hot chocolate recipe I used in the recycled frapuccino bottles. Isn't the Frostwood Lodge DSP just perfect for the little vests?! And the Northern Frost strip die makes cutting snowflakes a breeze!

(Tip: I prefer "off brand" frap such as Aldi's because the label is shrink-wrapped onto the bottle, leaving no sticky residue behind. Not to mention the cost savings! However, if you're a Starbucks devotee, you can remove the sticky residue after peeling the label by using lighter fluid and a paper towel.)

Have fun with your own holiday plans... now is the perfect time to start! -Kathy