Wednesday, September 28, 2011

A Soft Glimmer


The soft glimmer of Arla Ogle's swap card immediately caught my eye. It's a process with bleach, pastels and shimmer paint. Here's how she did it:
  1. Stamp using bleach on Early Espresso CS. When dry, use cotton balls or q-tips to apply pastels. Wipe the whole thing down with a tissue. Apply more pastel to reach desired color intensity.
  2. Use a sponge dauber to apply a thin coat of shimmer paint to stamp (Arla used champagne mist), stamp over pastel image by "eyeballing it" or use a Stamp-a-ma-jig for greater precision.
  3. Stamp with Versamark on Very Vanilla card base. Use cotton balls or Q-tips to apply pastel, wipe down. Overstamp with shimmer paint, as described above.
  4. With the extra shimmer paint left on the dauber, Arla accented the greeting.
I can hardly wait to try this myself! I've always been fascinated by alternate uses for household products. We appreciate your letting us CASE your project (that's demonstrator talk for Copy And Share Everything!). -Kathy

All Supplies Stampin' Up!

Stamps: Gently Falling (Holiday Mini)

Ink: Versamark, Early Espresso
Paper: Very Vanilla, Early Espresso, Cajun Craze, More Mustard
Accessories: Stampin' Pastels, Decorative Label punch, Champagne Shimmer Paint, Sponge Daubers, Stampin' Dimensionals

Monday, September 26, 2011

Emboss Resist of Many Colors


Today I want to introduce you to a demonstrator of only a few months, Joy Robinson. She has been working very hard to master new techniques and grow her confidence in composition, and I'd say we're seeing the beginning of a real success story, wouldn't you?! Note how she has repeated her colors multiple times to tie together the composition, the creative use of punches, and the subtle visual texture she achieved by embossing the Cajun Craze with the new stripes folder. Subtlety was important so that the complex pattern of the stamped image could shine! And speaking of that embossed image, I want to point out how, simply by the choice of colors, Joy shifted it into an autumn theme. You could easily sponge on blues and it would be wintry, or pastels for spring... General, flexible images like this are great to have tucked away in your arsenal for when nothing else seems to quite match the theme you had in mind for you card. Way to go, Joy! -Kathy

All Supplies Stampin' Up!

Stamps:
Day of Gratitude
Inks: Night of Navy, Cherry Cobbler, Summer Sun, Old Olive
Paper:
Night of Navy, More Mustard, Cajun Craze, Very Vanilla CS
Accessories:
Stripes Embossing Folder and Big Shot; Lace Border, Decorative Label and XL Oval punches; Black Stampin' Emboss powder and Heat Tool; Stamping Sponges; Stampin' Dimensionals

Monday, September 19, 2011

Adding Fabric to Your Cards


Good morning! While I am busily making surprises for the upcoming open house, I wanted to show you some of the lovely swaps from our most recent demonstrator meeting. This one comes from Julie Schmitz, who cleverly incorporated a strip of SU! fabric in her design as a ruffle by underlaying it with sticky strip and wrapping the ends around to the back of the embossed cardstock strip. The fabric gives such a nice tactile element to the card, as well as dimension.

Great job, Julie! -Kathy

Saturday, September 17, 2011

Birthday Wishes


Hey there,

Here's another card I CASED but did a little tweaking and added my own touch. I made it for my 9-year-old niece for her birthday last month and she absolutely loved it. She's a bug catcher to the core and always has something in a mason jar hatching. She didn't inherit that from me, because believe me, I'm the first to stomp on anything creepy crawly! :)

Enjoy,
Monique.


All materials are Stampin' Up! unless otherwise noted

Stamps: Birthday Bakery (Hostess 2010-11)
Ink: StazOn Black and Versamark
Paper: Whisper White, Chocolate Chip, Real Red, and Old Olive DSP
Accessories: Watercolor Pencils (Red, pink, green, brown, and gray),* Circle and Modern Label punches, Dazzling Diamonds.

* Non-Stampin' Up! product.

Friday, September 16, 2011

You Are What You Eat...


Hello there,

Unfortunately I can't claim this creation, but when I saw it I had to CASE it, too cute! My picture isn't the best but hopefully you can see the scalloped awning and ledge. Easy to make with lots of 'wow' factor.

Thanks, Monique.


All materials are Stampin' Up! unless otherwise noted

Stamps: Birthday Bakery (Hostess 2010-11)
Ink: StazOn Black
Paper: Whisper White, Pretty in Pink, Chocolate Chip, and Pretty in Pink DSP
Accessories: Watercolor Pencils (Red, pink, brown, green and gray),* Scallop Edge Border punch,
Ribbon: Pretty in Pink Satin ribbon, Dazzling Diamonds.

*Non Stampin' Up! product.

Wednesday, September 14, 2011

Lawrence Stamp Club - September 2011


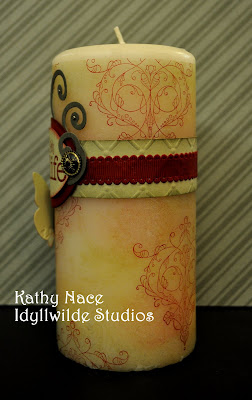
If you've never made a stamped candle, you are missing out on a world of possibilities! You can choose the color, theme, designs... the whole shebang, in fact. And each time the recipient gets a look at it, the light of friendship glows brightly all over again.

I began with a basic vanilla pillar candle, adding subtle colors in drifts and (although it didn't register well in the photograph) with a wheel. Did you realize you can get uninked cartridges for our wheels and apply any color of reinker? Then I stamped my main image from Always Elegant in that yummy Cherry Cobbler shade.

We added some elements from the Big Shot, and voila! Great gift for all kinds of occasions... wouldn't it be nice presented with a coordinating tile to set it on?!

Of course, the standard caveats apply: Always place candle on a non-flammable surface; never leave candle unattended; and do not burn below paper embellishments. But really, who would want to burn this beauty, anyway?! -Kathy

Tuesday, September 13, 2011

Holiday Open House Saturday, October 1


We would like to invite you to an open house at Idyllwilde Studios on Saturday, October 1. This is a drop-in event (10:00am-2:00pm) with all the essentials: stuff to look at, stuff to eat, stuff to do, stuff at deep discounts, and free stuff!!

We will have displays for Halloween, Thanksgiving, and Christmas that cover treat packages, table settings, hostess and themed gift ideas, cards and decorations. You'll be able to try out a couple of Stampin' Up! tools that you may never have had the chance to use, and you can make your very own project to take home with you (along with that free stuff I mentioned and, if you choose, some of that deeply discounted stuff that will be on the "garage sale" table). If you bring a friend who has never been to the studio before or if you place an order of $15 or more, you will be entered in the drawing for a free stamp set! Oh, and the snacks... did I mention there would be snacks?

We think this will be a lovely way to kick off the holiday season, and hope that you can join us at 1012 Pennsylvania.

-Kathy, Monique & Lori

Olathe Stamp Club - September 2011


The gals in Olathe were fascinated by the idea of adding movement to stamped images, so we looked at two ways of doing this for our September project. One method involves touching down and then dragging the stamp; the other relies on a series of images stamped without re-inking. It's not quite as easy as it looks, but it sure is fun playing around with these effects!

By now there are numerous examples of the faux brad technique on the blog, but this time I added a stamped pattern before I punched them out and coated them with Crystal Effects. A tweak here and there keeps the work fresh, don't you think?!

And for those of you paper savers, note that on the second example I have used a double row of 1/4" strips of cardstock to echo the stripes so often found on team uniforms. I just happen to have soccer-crazy nephews who have birthdays every year... -Kathy


Friday, September 9, 2011

Angry Bird Birthday


Hello again,

I made this card for a co-worker's birthday who's addicted to Angry Birds and is playing it on his phone any chance he gets. I've not played the game myself (probably a good thing...) but I hear it's all the rage! Happy Birthday Justin!

Monique.


All materials are Stampin' Up!

Ink: Chocolate Chip
Paper: Bashful Blue, Basic Black, Whisper White, Chocolate Chip, Real Red, Old Olive, and Daffodil Delight. Certainly Celery and Wild Wasabi
Accessories: Word Window, Scalloped Oval, Large Oval, Owl Builder, Various Circles and Boho Blossoms punches; linen thread.

Thursday, September 8, 2011

Autumn Days

Hey there,

This is a 'just because' card I made for my hunny. Earned me a foot rub! :) Think I'm going to have to make a few more!

Monique.


All materials are Stampin' Up!

Stamps: Autumn Days
Paper: Whisper White, Crumb Cake, Handsome Hunter (retired)
Ink: Crumb Cake, Always Artichoke and Versa Mark
Stampin' Write Markers: Chocolate Chip, Always Artichoke and Handsome Hunter (retired)
Accessories: Linen Thread, Mini Polka dot Texturz Plate

Friday, September 2, 2011

Holiday Mini is HERE!


Good Bye to Summer and bring on the Holiday Mini!