Sunday, December 11, 2011

Stamp Club Olathe - December 2011


I'm really not trying to "cheat" by dating this post in December. I was working on it when I was struck down by a nasty infection, and slept away about 10 days of December in a medication-induced haze. I'm back in the saddle again, but I just wanted it in chronological order!

We were planning for some guests at our December meeting in Olathe, so I selected a supersimple thank you note and matching envelope project (thanks to Monique for bringing this simple layout to my attention recently). Aren't they striking? And the beauty of it is, that you can so easily make a gift of your thanks by packaging several blank cards together so that the recipient can keep the gift of gratitude going.

These cards measure 4.25" and can be mailed in our standard-sized envelope (decorated to match) or hand-delivered in an envelope made from coordinating DSP - watch for future posts!

-Kathy


Stamps: Daring Adventure and Thank You Kindly
Ink: Crumb Cake and Cherry Cobbler classic
Paper: Very Vanilla, Basic Black and Cherry Cobbler CS; Timeless Portrait DSP
Accessories: Basic Pearls

Monday, December 5, 2011

Stamp Club Lawrence - December 2011


This is such a creative use of Pocket Silhouettes! And of course I always like the fresh look of a "clean & simple" approach. I CASEd and tweaked from something I saw on Joanne Friend's post on our demonstrator web site. The sentiment from Welcome Christmas was perfect, suggesting a medallion with a single, simple impression. Cherry Cobbler has become my favorite color this year, but even if that weren't so a simple knot of the scallop dots ribbon gives the composition "pop".

I hope you can find simple solutions to your many tasks in the coming days. -Kathy

Thursday, December 1, 2011

Festival of Trees - Auction

Thank you to my faithful and generous club members who gave their time and skill in helping me create the decorations for our tree, and to my husband Mark who helped me haul it to the display site. I am thrilled to report that our efforts brought $500 dollars to the total of nearly $38,000 raised to benefit The Shelter, Inc. As a former foster parent, I am thrilled to be able to help maintain the existence of a safe place for kids who have to be removed from their homes suddenly and often without basic necessities.

May it one day become unnecessary. -Kathy

Sunday, November 27, 2011

Festival of Trees 2011 - Schedule


Want to reclaim that sense of childhood wonder for just a bit? Get yourself to the Lawrence Festival of Trees! Located in the historic former Opera House (now Liberty Hall, 642 Massachusetts in downtown Lawrence), the darkened auditorium absolutely sparkles with all manner of visual sugarplums. Admission is just $3 (kids are free) and there are 56 trees to inspire you, from our traditional sparkling snow-in-the-forest look to a mosaic from broken dishes, a tree made from retired street light globes, a moving sculpture tree, a tree of stars, and many themes in all colors - plus 25 wreaths/small objects! I could hardly bear to leave when set-up was done, I just wanted to sit down in the middle of it all and soak it in.

Viewing:
Monday, November 28 10am-8:30pm
Tuesday, November 29 10am-5pm
Wednesday, November 30 10am-8:30pm
Thursday, December 1 10am-8:30pm

Auction:
Tuesday, November 29 7:30pm
(admission $35-50, I have two free passes to share if you want to see what our tree brings and report on it! We're #15)

Proceeds from auction and viewing benefit The Shelter, Inc., which provides emergency services for youth in the Lawrence community.

And don't forget the traditional Old-Fashioned Christmas Parade, Saturday December 3, 11:00am. Owners of antique horse-drawn conveyances from as far away as Texas bring their decorated horses and buggies along with costumes for themselves. Such a charming tradition and a great way to get in the mood! -Kathy

Festival of Trees 2011 - Folded German Bells


I know you've been wondering what our folded German bell ornaments would look like. I finally finished them last night as I was working on our Festival of Trees Entry, so here's a close-up, all painted and accented with ivy and berries. Let this be a lesson to you skeptics who thought yours wouldn't look good...! They were the perfect contrast in shape and size to the petal cones we made first.

Apologies to the Olathe gals, I managed to forget the materials we needed so they didn't make bells. However, you can find the instructions at http://www.allthingspaper.net/2009/12/folded-german-bell-tutorial.html and make your own! We used 6x6" squares of DSP, which I then spray painted a pale green. -Kathy

Thursday, November 10, 2011

Mocha Morning Aux Elegantes


I'm going to post this one for Lori while their family gets settled into a new house. Did you notice these items at the Open House in October? I thought they were definitely worth a second look!

These papers are from the Mocha Morning specialty designer series paper pack. It is simply scrumptious. I'm thinking of using it for all my holiday themes from here to the new year!! On the left is a little "pocket" - you can make it any size that meets your needs - with the seam up the back and a little crimp at the bottom edge. It could hold napkin, cutlery, a name for the Christmas gift exchange, poem/message, photograph of guest, packet of tea/chocolate... any number of things, all dressed up.

On the right are two Hershey nuggets wrapped in strips of paper, then attached via glue dot to two scallop circle punches and tied with 1/4" satin ribbon. I just happen to be putting together table settings for a banquet in two weeks. Give you one guess what I'm going to CASE! -Kathy

Monday, November 7, 2011

Pretty Cute Packaging!


Look what's under the tree! Have you noticed those little craft-colored fold-up boxes in the holiday mini catalog? They are one of my current favorite products! They are just the right size for a stack of gourmet cookies or homemade candies, 4 scented votives, a squatty jar of preserves, and... But wait! I can't tell you yet what's in mine, it's top secret!! But I WILL tell you how I put together the wrap.

Fold up one of those cute little boxes (they come 4/pack for less than $1 each). Cut a 2x12" strip of card stock and wrap around the box (won't quite meet on the bottom, but who's looking?!). Rip a strip of fabric 1" wide and tie around the box with a double knot (this happens to be from our holiday set so it coordinates perfectly with the DSP I used on the tags). Stamp your sentiment and punch out w/ the 2 3/8" scallop circle punch; sponge edges. Punch out a background circle of DSP with the 2 1/2" circle punch. Glue these two together, then punch a 1/8" hole at the top. Thread a double thickness of baker's twine through the hole, and tie onto the fabric knot.

Ta Da! Super simple. Don't you wish all your gift wrapping could be so painless?
-Kathy

All supplies Stampin' Up!

Stamps:
Delightful Dozen
Ink:
Cherry Cobbler classic
Paper:
Naturals Ivory and Early Espresso CS; Holly Berry Bouquet DSP
Accessories:
Holly Berry Bouquet Designer fabric; 1/8" handheld, 2 3/8" scallop circle, and 2 1/2" circle punches; sponge; Tombow MultiPupose liquid glue; Cherry Cobbler baker's twine

Wednesday, November 2, 2011

It's Good To Be The Hostess

It's Good to Be the Hostess Promotion

Get an additional $35 in FREE Stampin’ Up! products when you host a $350 workshop November 1-December 15! This is in addition to all the other benefits you get as a Stampin’ Up! hostess.

If your workshop sales total is

You earn hostess dollars


It’s Good to Be the Hostess

Total Free Stampin’ Up! Merchandise

Plus, you earn full-priced items at 50% off

$350

$50

+

$35

$85

---

$400

$65

+

$35

$100

1 item

$500

$80

+

$35

$115

2 items

$750

$120

+

$35

$155

3 items

$1,000+

$160 plus 15% of amount over $1,000

+

$35

$195 plus 15% of amount over $1,000

4 items

Schedule a workshop today and get set to create for the holidays with all of the exciting hostess rewards you’ll receive!


Visit Here

Monday, October 31, 2011

Festival of Trees 2011 - Petal Cone Potpourri Recipe


My sister Karen has generously agreed to share her original potpourri recipe with everyone. Thank you for patiently waiting while I pulled together photos and such!

Some of you asked if she would sell it ready-made. The answer is yes, for $17/quart. The expensive part of the mix is the essential oils, especially if you're starting with none. We bundles ours in organza scallop circles from the wedding section at the Dollar Tree (25/pkg) and tied with gardener's twine from the Target dollar bin.


Autumn-to-Winter Potpourri

1-2 qts assorted "gatherings" such as:
-small acorns, preferably green*
-seed pods (e.g. Illinois bundleweed, buttonweed)*
-garlic chive flowers*
-1 qt cedar tips with blue & green berries attached*
-1-2 c red rose petals**
-1/2 c hawthorne berries**
-1/4 c whole cloves

Mix gently in large glass (not plastic!) container, then sprinkle over top:

-2 T orris root (binds scent)**
-10-15 drops each essential oils of clove, balsam fir, pine
-20 drops cassia (cinnamon)
-5 drops peppermint
-20 drops cedarwood

Seal container and set to "cure" in dark place about 2 weeks. Makes about 1 gallon.

* Dry ingredients individually before adding. Cedar may be fresh.
**Purchased


Note: Other possible ingredients might include broken cinnamon sticks, tiny pine cones, dried orange peel, straw flower heads, dried statice.

What a great activity to look for "gatherings" while you're on a country walk! You'll see so much more than you ever imagined when you're on the hunt... -Kathy

Friday, October 21, 2011

Festival of Trees 2011- Petal Cones


Each year Lawrence hosts the Festival of Trees, the proceeds of which benefit a local shelter. The Lawrence and Olathe stamp clubs are working to help me create a tree for this event which will then be auctioned to raise funds.

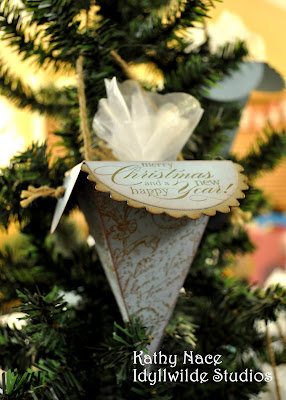
Our first project uses the Petal Cone Die. It's cut from Baja Breeze CS on the Big Shot and then rolled with a vintage wheel for visual texture, then we've added a holiday wish to the flap and sponged the edges. Gardener's twine "dresses it down" to coordinate with the woodsy feel of the entry (each entry has to have a name and a theme).

My sister developed a unique potpourri of local "gatherings" to fill the little organza bundles (she has promised to share the recipe in a future post, so stay tuned!). They smell simply wonderful! As I began to hang them on the tree, I realized there was another obvious use for these beauties: they would be perfect to hang on the posts or backs of chairs, or on doorknobs, or from lamps either as home decor or as a little gift for guests to take along as a memento of tea or dinner at your house.

We'll be making another festival entry project next month, and I'll post viewing times and locations so you can see the finished tree! -Kathy


All Supplies Stampin' Up'! Unless Otherwise Stated

Stamps-Very Vintage (jumbo wheel), Delightful Dozen (sentiment)
Inks- Soft Suede and Crumb Cake classic, Creamy Caramel cartridge (retired)
Paper- Baja Breeze CS
Accessories-Big Shot, Petal Cone die, jumbo stampin' around handle, Sticky Strip, 1/8" handheld punch, Gardener's Twine (Target dollar bins), Organza Scallop Circles (Dollar Tree)

Thursday, October 20, 2011

Stamp Club Olathe - October 2011


Our topic for club this month was a technique I call "Foreground/Background". It's a way to get a whole new look from your stamps, adding dimension without a lot of layers.

The concept works by understanding the way our brains interpret what our eyes see. Things in the distance/background are typically softer, less detailed, faded in color, and smaller; conversely, things in the foreground are crisp, full of detail, brighter, and larger. You can recreate these contrasts by varying your supplies and, in this case, using only part of your stamped image in the "background" to create "smaller" elements, as I've done here using the large pine tree from the set Lovely as a Tree.

You're also seeing "Faux Snow", a mixture of white embossing powder and Dazzling Diamonds applied over Tombow glue for sparkle and dimension. A little touch of Cherry Cobbler in the ink and ribbon gives it "pop". The sentiment is from Delightful Dozen.

Next time you take a walk, pay attention to the differences in how you see what's close at hand, and what is distant. You'll gain a new appreciation for the beauty that surrounds us! -Kathy

Wednesday, October 12, 2011

Holiday Open House Drawing Winner!!


Congratulations to Lara B., our winner in the drawing at the October 1st Idyllwilde Studios Holiday Open House! We hope she enjoys her stamps and rub-ons.

We also want to thank each one of you for stopping by - we had a great time, and hope you did too. Those of you who ordered holiday designer series paper at the event will find an instruction sheet with pattern for the snowman soup bottles pictured above, including the recently-perfected hot chocolate recipe I used in the recycled frapuccino bottles. Isn't the Frostwood Lodge DSP just perfect for the little vests?! And the Northern Frost strip die makes cutting snowflakes a breeze!

(Tip: I prefer "off brand" frap such as Aldi's because the label is shrink-wrapped onto the bottle, leaving no sticky residue behind. Not to mention the cost savings! However, if you're a Starbucks devotee, you can remove the sticky residue after peeling the label by using lighter fluid and a paper towel.)

Have fun with your own holiday plans... now is the perfect time to start! -Kathy

Wednesday, September 28, 2011

A Soft Glimmer


The soft glimmer of Arla Ogle's swap card immediately caught my eye. It's a process with bleach, pastels and shimmer paint. Here's how she did it:
  1. Stamp using bleach on Early Espresso CS. When dry, use cotton balls or q-tips to apply pastels. Wipe the whole thing down with a tissue. Apply more pastel to reach desired color intensity.
  2. Use a sponge dauber to apply a thin coat of shimmer paint to stamp (Arla used champagne mist), stamp over pastel image by "eyeballing it" or use a Stamp-a-ma-jig for greater precision.
  3. Stamp with Versamark on Very Vanilla card base. Use cotton balls or Q-tips to apply pastel, wipe down. Overstamp with shimmer paint, as described above.
  4. With the extra shimmer paint left on the dauber, Arla accented the greeting.
I can hardly wait to try this myself! I've always been fascinated by alternate uses for household products. We appreciate your letting us CASE your project (that's demonstrator talk for Copy And Share Everything!). -Kathy

All Supplies Stampin' Up!

Stamps: Gently Falling (Holiday Mini)

Ink: Versamark, Early Espresso
Paper: Very Vanilla, Early Espresso, Cajun Craze, More Mustard
Accessories: Stampin' Pastels, Decorative Label punch, Champagne Shimmer Paint, Sponge Daubers, Stampin' Dimensionals

Monday, September 26, 2011

Emboss Resist of Many Colors


Today I want to introduce you to a demonstrator of only a few months, Joy Robinson. She has been working very hard to master new techniques and grow her confidence in composition, and I'd say we're seeing the beginning of a real success story, wouldn't you?! Note how she has repeated her colors multiple times to tie together the composition, the creative use of punches, and the subtle visual texture she achieved by embossing the Cajun Craze with the new stripes folder. Subtlety was important so that the complex pattern of the stamped image could shine! And speaking of that embossed image, I want to point out how, simply by the choice of colors, Joy shifted it into an autumn theme. You could easily sponge on blues and it would be wintry, or pastels for spring... General, flexible images like this are great to have tucked away in your arsenal for when nothing else seems to quite match the theme you had in mind for you card. Way to go, Joy! -Kathy

All Supplies Stampin' Up!

Stamps:
Day of Gratitude
Inks: Night of Navy, Cherry Cobbler, Summer Sun, Old Olive
Paper:
Night of Navy, More Mustard, Cajun Craze, Very Vanilla CS
Accessories:
Stripes Embossing Folder and Big Shot; Lace Border, Decorative Label and XL Oval punches; Black Stampin' Emboss powder and Heat Tool; Stamping Sponges; Stampin' Dimensionals

Monday, September 19, 2011

Adding Fabric to Your Cards


Good morning! While I am busily making surprises for the upcoming open house, I wanted to show you some of the lovely swaps from our most recent demonstrator meeting. This one comes from Julie Schmitz, who cleverly incorporated a strip of SU! fabric in her design as a ruffle by underlaying it with sticky strip and wrapping the ends around to the back of the embossed cardstock strip. The fabric gives such a nice tactile element to the card, as well as dimension.

Great job, Julie! -Kathy

Saturday, September 17, 2011

Birthday Wishes


Hey there,

Here's another card I CASED but did a little tweaking and added my own touch. I made it for my 9-year-old niece for her birthday last month and she absolutely loved it. She's a bug catcher to the core and always has something in a mason jar hatching. She didn't inherit that from me, because believe me, I'm the first to stomp on anything creepy crawly! :)

Enjoy,
Monique.


All materials are Stampin' Up! unless otherwise noted

Stamps: Birthday Bakery (Hostess 2010-11)
Ink: StazOn Black and Versamark
Paper: Whisper White, Chocolate Chip, Real Red, and Old Olive DSP
Accessories: Watercolor Pencils (Red, pink, green, brown, and gray),* Circle and Modern Label punches, Dazzling Diamonds.

* Non-Stampin' Up! product.

Friday, September 16, 2011

You Are What You Eat...


Hello there,

Unfortunately I can't claim this creation, but when I saw it I had to CASE it, too cute! My picture isn't the best but hopefully you can see the scalloped awning and ledge. Easy to make with lots of 'wow' factor.

Thanks, Monique.


All materials are Stampin' Up! unless otherwise noted

Stamps: Birthday Bakery (Hostess 2010-11)
Ink: StazOn Black
Paper: Whisper White, Pretty in Pink, Chocolate Chip, and Pretty in Pink DSP
Accessories: Watercolor Pencils (Red, pink, brown, green and gray),* Scallop Edge Border punch,
Ribbon: Pretty in Pink Satin ribbon, Dazzling Diamonds.

*Non Stampin' Up! product.

Wednesday, September 14, 2011

Lawrence Stamp Club - September 2011


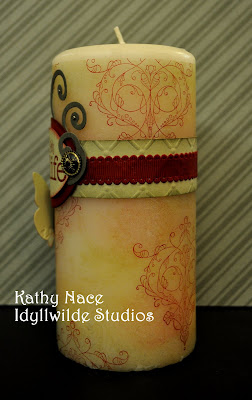
If you've never made a stamped candle, you are missing out on a world of possibilities! You can choose the color, theme, designs... the whole shebang, in fact. And each time the recipient gets a look at it, the light of friendship glows brightly all over again.

I began with a basic vanilla pillar candle, adding subtle colors in drifts and (although it didn't register well in the photograph) with a wheel. Did you realize you can get uninked cartridges for our wheels and apply any color of reinker? Then I stamped my main image from Always Elegant in that yummy Cherry Cobbler shade.

We added some elements from the Big Shot, and voila! Great gift for all kinds of occasions... wouldn't it be nice presented with a coordinating tile to set it on?!

Of course, the standard caveats apply: Always place candle on a non-flammable surface; never leave candle unattended; and do not burn below paper embellishments. But really, who would want to burn this beauty, anyway?! -Kathy

Tuesday, September 13, 2011

Holiday Open House Saturday, October 1


We would like to invite you to an open house at Idyllwilde Studios on Saturday, October 1. This is a drop-in event (10:00am-2:00pm) with all the essentials: stuff to look at, stuff to eat, stuff to do, stuff at deep discounts, and free stuff!!

We will have displays for Halloween, Thanksgiving, and Christmas that cover treat packages, table settings, hostess and themed gift ideas, cards and decorations. You'll be able to try out a couple of Stampin' Up! tools that you may never have had the chance to use, and you can make your very own project to take home with you (along with that free stuff I mentioned and, if you choose, some of that deeply discounted stuff that will be on the "garage sale" table). If you bring a friend who has never been to the studio before or if you place an order of $15 or more, you will be entered in the drawing for a free stamp set! Oh, and the snacks... did I mention there would be snacks?

We think this will be a lovely way to kick off the holiday season, and hope that you can join us at 1012 Pennsylvania.

-Kathy, Monique & Lori

Olathe Stamp Club - September 2011


The gals in Olathe were fascinated by the idea of adding movement to stamped images, so we looked at two ways of doing this for our September project. One method involves touching down and then dragging the stamp; the other relies on a series of images stamped without re-inking. It's not quite as easy as it looks, but it sure is fun playing around with these effects!

By now there are numerous examples of the faux brad technique on the blog, but this time I added a stamped pattern before I punched them out and coated them with Crystal Effects. A tweak here and there keeps the work fresh, don't you think?!

And for those of you paper savers, note that on the second example I have used a double row of 1/4" strips of cardstock to echo the stripes so often found on team uniforms. I just happen to have soccer-crazy nephews who have birthdays every year... -Kathy


Friday, September 9, 2011

Angry Bird Birthday


Hello again,

I made this card for a co-worker's birthday who's addicted to Angry Birds and is playing it on his phone any chance he gets. I've not played the game myself (probably a good thing...) but I hear it's all the rage! Happy Birthday Justin!

Monique.


All materials are Stampin' Up!

Ink: Chocolate Chip
Paper: Bashful Blue, Basic Black, Whisper White, Chocolate Chip, Real Red, Old Olive, and Daffodil Delight. Certainly Celery and Wild Wasabi
Accessories: Word Window, Scalloped Oval, Large Oval, Owl Builder, Various Circles and Boho Blossoms punches; linen thread.

Thursday, September 8, 2011

Autumn Days

Hey there,

This is a 'just because' card I made for my hunny. Earned me a foot rub! :) Think I'm going to have to make a few more!

Monique.


All materials are Stampin' Up!

Stamps: Autumn Days
Paper: Whisper White, Crumb Cake, Handsome Hunter (retired)
Ink: Crumb Cake, Always Artichoke and Versa Mark
Stampin' Write Markers: Chocolate Chip, Always Artichoke and Handsome Hunter (retired)
Accessories: Linen Thread, Mini Polka dot Texturz Plate

Friday, September 2, 2011

Holiday Mini is HERE!


Good Bye to Summer and bring on the Holiday Mini!

Thursday, August 25, 2011

Love Those Demonstrators!!


It has become a much-anticipated tradition that the group of demonstrators I hang with stages a "mini-conference" each August. We all create a project for the others to do, and go home with a dozen or more great ideas/samples for the price of one! Not to mention, there is a super pot luck lunch, lots of laughter, and
chocolate. Now, don't you wish YOU were a demonstrator, too?! (You could be, you know - just talk to me about that secret longing...)

This is the card I prepared to share with the group. I wanted to highlight the fact that Stampin' Up! is an international company, and many of our stamps are available in Spanish and French as well as English! Sooo, here is the marvelously elegant
My Friend stamp set in French, stamped in black craft ink on River Rock CS. We used En Francais with Versamark Ink for some background visual texture. The sentiment is also stamped in craft on River Rock - give it plenty of time to dry before you "fussycut" that thing, or for some deep shine try embossing the foliage and the sentiment with black embossing powder. For a little zing, I introduced some Cajun Craze "lace" made with the new Lace Ribbon Border Punch - takes just half a strip per side. The card base is Basic Black, and the technique for the faux brads can be found in the Noember 18, 2009 post. Inside, we masked off part of a stamp from the On Your Birthday set for a more general sentiment. The foliage is stamped again in Versamark, and the corners are nipped with the Ticket Corner Punch.

It's pretty simple, but striking, don't you think? Stay tuned for more samples using this set - I can just feel that it's going to be a favorite! Kathy

Olathe Stamp Club - August 2011


I promised the girls in Olathe that I'd tell them the secret to instant weight loss. They got really excited - especially when they each mastered it for themselves in the space of an hour! We worked with sponges and layering and drop shadows using markers and multiple colors on solid stamps and masks. The really great thing is that these techniques can be applied equally to card-making and scrap booking, and use only basic tools & supplies that almost everyone has in their arsenal.

Just think how much less cards and scrap book pages would weigh if they could be completed with a single layer of paper - without giving up visual interest!
-Kathy

Thursday, August 11, 2011

Summer at the Shore


Couldn't resist posting a handful of pix from our time in Michigan's Upper Peninsula in late July. The first shot is from the dock at our quirky little cabin, about eight feet from the lake shore! Isn't it breathtaking?! Of course we saw lighthouses (picture #2 is a lens for a light), and we discovered the Pictured Rocks National Lakeshore on the southern tip of Lake Superior. The colors you see are from minerals that leach into the groundwater and leak out the edges of the cliffs. On the way home, we paused in Hayward, Wisconsin, for the International Lumberjack Competition. These guys are in the air about 90 feet, preparing to "freefall" to mats at the bottom of the poles as fast as they can to shave seconds off their time. Hooooo-eee. Just one of a number of things I will likely never feel compelled to do. It was fascinating to watch.

Here's wishing each of you time to watch a sunset or plan an experience just outside the familiar. -Kathy

Wednesday, August 3, 2011

Katelyn's Bouquet


Katelyn is the niece of one of my stamp club members. She paid a visit to the studio while she was here, and I showed her the peeled paper flowers. Before long, she had completed almost 40 of them, using just about every color under the rainbow. Isn't this a sight for sore eyes at a time of year when the heat is leaching the color out of just about everything else in the landscape?!

Good job, Katelyn! You certainly met the challenge for the month of using these flowers in a new context. -Kathy

Monday, August 1, 2011

Lawrence Stamp Club - August 2011


I was excited when the hostess for club this month requested we use a letterpress plate, since I just hadn't got round to trying them out yet (although I have used some of the texture plates in a similar manner). The project I designed uses the new Fancy Fan design, which I inked in white craft before printing onto Calypso Coral. These plates emboss slightly while transferring the ink to the paper. It's just like helping my dad on the little printing press he used to use for engraved invitations!

Atop some Little Leaves sizzlet shapes in Certainly Celery is a collection of soft punched and "peeled" flower clusters on the right, accented with Basic Pearls. The sentiment is from Word Play, with a card base in Poppy Parade.

Enjoy what blooms remain in you garden this month. -Kathy

August Promotion -Buy 3, Get 1 FREE

 Buy 3 Packs of the New Designer Series Paper and GET 1 FREE!
Sale is only through these dates August 1-31, 2011 

Wednesday, July 27, 2011

Spice Up Your Embosing


I discovered heat embossing early on in my stamping career, and fell instantly in love with it! It's still my favorite "wow" technique, giving me a thrill each time I watch those granules change from tiny colored grains into a smooth, shiny image.

As with many things, I bought all kinds of brands and types of powders before I learned to simplify! How to store this collection efficiently when only two were alike to begin with? I saw an idea somewhere for putting the powders into spice jars. I commented at stamp club one evening that I was looking for a wall-mount spice jar rack, and my friend Lori came bringing me this from a garage sale a couple of months later. I LOVE IT. Most of the colors I had accumulated just got dumped into the spice jars, and I ran lid labels onto Whisper White and punched them out. A couple of the jars had lids missing. Amazing as it seems, the lids from the SU! embossing powders fit perfectly, completing my set.

Want to learn from my mistakes as you start out? Here's what you need to know when you can't find anyone to ask in the craft store aisles:

When you first begin to heat emboss, invest in a
good quality heat gun. Tool temperatures can vary by as much as 300 degrees, and you don't want to be disappointed because your powder won't melt! Be sure the metal tip of the gun is not exposed so you avoid burns (it's hotter than your curling iron, gals!). It's also nice to have a tool that comes with a guarantee - think Stampin' Up! here. This is an investment for the long haul, not worth the "savings" when you have to buy two or three cheaper heat guns over the same period of time that one quality tool will last.

Next, you'll need a way to stick the embossing powder to the paper until you can melt it. Here's where the amazing
VersaMark ink comes in. It remains tacky for about 10 minutes, giving you plenty of time to work.

Of course, you'll need some
embossing powder. Did you know it comes in three grades? Fine or "detail" is good for those really delicate images, medium (most readily available and not usually labeled as to grade), and thick/heavy (sometimes used for an overall coating, such as the clear "Glassy Glaze" which makes such an interesting cracked or stained glass effect). A one ounce jar will last...and last...and last! To keep your powder true to color, make sure you shake it into a clean receptacle to return it to the original container.

Top Secret Tip: You do not need one of every color embossing powder. You need black, white, metallics (including Ver-de-gris if you like that), and clear. This is true with very few exceptions and simplifies things so much! Here's what to do: Coat your stamp with Versamark. Next, stamp into the classic ink color you want your embossed image to appear. Now stamp onto your cardstock, apply clear embossing powder and heat set. Your finished image will appear to be whatever color ink you used! This saves you so much space and $$! And it will not damage your ink pads (just be sure to clean your stamp before you put it on the Versamark again).

An
embossing buddy isn't essential to the actual process of heat embossing, but you'll be especially glad you have one in the winter or if your crafting space is carpeted. It's a little bag filled with a powder that cuts static electricity, which can cause rogue granules to stick to your project where you don't want them! This little gizmo will save you lots of time and angst and ensure a clean, clear finished image with just a simple swipe across your card stock before you stamp the image.

Speaking of those receptacles. I started with flexible paper plates. These work okay, and it's what I could afford at first after I bought the above. You can just fold the plate in half to create a channel and send those unused granules back into the jar for the next time. However. Once the plate has uncooperatively "popped" on you a couple of times, showering embossing granules all over you and your work area, you may want to rethink the decision to purchase a set of the Powder Pals. Their shape helps control the flow of the powder, and the little removable plugs in the narrow end let you keep control of what falls out, when!

Finally, I keep a couple of tiny paint brushes and a larger brush (for cleaning my work area) nearby. The small brushes work well if I want to remove embossing powder granules from part of the image before heat setting.

Hope you find this helpful as you work with this very rewarding technique! -Kathy

Tuesday, July 26, 2011

Butterfly Ring Notepad


Stamping supplies:
Asst. Stampin’ Up Card Stock
Rose Red Ink
Stampin’ Up! Sponges
Background Texturz Plate
Basic Black 1-1/4” Striped Grosgrain Ribbon
Blushing Bride -½” Stitched-Poly Ribbon
Marina Mist 1/8” Taffeta Ribbon
Basic Pearls Jewels
Glue Dots
*Sticky Notepad
*Ring Clip

Monday, July 25, 2011

Pennants & Fun Folds


Today I have a couple of examples from a recent swap with other demonstrators for you.

The first showcases the new Petite Pennants Builder punch and mini clothespins that you'll find in the 2011-12 IB&C. Thanks, Deloris!

The second is called a "center step" card/fold. I think it makes a great presentation for a little piece of cardstock - wouldn't it showcase a photo or some really nice watercoloring well? This is the quick version, letting some beautiful DSP do the work for you (Beyond the Garden). The new Four Frames stamp set guides the eye to the sentiment. Good choice, Lily - I'm a bit of a "fun fold junkie" and I'd never seen this one before.

Be inspired! I sure was... -Kathy