Wednesday, February 29, 2012

Register Now for Asia Inspired


The event schedule promised that in this class you would find "subtle elegance. Exotic materials. Touchable artifacts. Unexpected projects." The art of Asia has such varied faces, from "spare and elegant" to "little and cute". Perhaps this is part of what draws us to explore it.


Nine years ago I was privileged to visit China and Japan on a study tour. While there, I collected artifacts, anecdotes and materials that I have been weaving into the fabric of a yearly class on the subject in appreciation of the opportunity of making this trip. So while a few projects will use Stampin' Up! stamps and materials so that you can replicate them, others will be one-of-a-kind creations due to limited materials from my stash.

The photos above provide a retrospective of just a few of the projects I have created for past classes (actual projects for this session will remain a mystery until you arrive, as they depend on class size and other factors - but I will tell you that the ivory pendant necklace we'll be making is a stunner!).


We will meet on Saturday, March 10, from 1-4:00pm at Idyllwilde Studios. Class fee is $18.00 (remember, it's your payment that secures your spot). The class size is limited, although if I have to put too many of you on a waiting list I will consider adding another session.
Do contact me with any questions you may have, or to reserve your place. I look forward to being your travel guide for the afternoon! -Kathy 785.841.9211

Sunday, February 26, 2012

Sale-a-bration Sundays: Lisa's Card


Friend and fellow demo Lisa sent along this card featuring Sale-a-bration paper. Can you see the way she's used the postage stamp punch to form a decorative quilt-like strip before running it through the Big Shot with the edgelit die? Even though Island Indigo isn't actually in the paper palette, it does a wonderful job of enhancing the colors of the patterned paper. Way to go, Lisa! -Kathy

Monday, February 20, 2012

Stamp Club Olathe - February 2012


I think the laser cut cards in the spring mini catalog are fabulous, so I couldn't pass up the chance to use them for the base of our February club project in Olathe. I looked around in the top secret demonstrator idea files, and didn't find anything I wanted to replicate, so I decided to think through my approach on my own.

The laser cut is very intricate, which suggested a simple treatment on the rest of the card. Furthermore, it's so lovely, I didn't want to cover it up, which suggested vellum as the solution for the sentiment banner. I really wanted to feature the new pleated ribbon, and lastly, I wanted a design that could be used either as a Valentine, or for other occasions this spring (such as Mother's Day or simply "I love you").

Here's what I came up with, and the ladies seemed to like it. What are your ideas for these laser cut cards? -Kathy

Sunday, February 19, 2012

Sale-a-bration Sundays: Hat Box


This is my very favorite of the Sale-a-bration projects I've made this year (thank you, Patty Bennett, for the inspiration) so I'm showing it off to you on my birthday! I just grin each time I catch sight of it. Did you note the hat pin? Right where it ought to be, on a hat!

The crown of this little beauty is one of the containers that our brads and buttons come in (if you don't have any empties, you can get them for about 65 cents each on p. 226 of the Idea Book & Catalog). What a perfect place to stash some candies, or to nestle a necklace or some earrings on a bed of cotton as a birthday or Mother's Day gift.

What's that you say? Oh. Yes, OF COURSE we will be making this one in class! Don't miss it. -Kathy

Wednesday, February 15, 2012

Stamp Club Lawrence - February 2012


This month our hostess asked for a pop-up card. I was thrilled, as I think cards that "do tricks" are super popular with everyone (but especially guys and kids). So I set out to find one I liked, and came across this great double pop up on Brenda Quintana's blog.

We used Real Red craft ink (you know you can get "blank" full-sized craft pads which you can juice up with the re-inker of your choice, right?!) with the Valentine image from Sweet Centers on the front (along with some darling retired ribbon - check that Clearance Rack regularly!) to make the image really pop! Inside, we did our pop-up magic on some DSP from the In-Color Patterns Pack, with a bit of bling using silver Glimmer Paper (carried over from the Holiday Mini) and hand-colored Basic Rhinestones.

The little LED tea light used scraps from the card project, along with the 1 3/4" scallop circle punch and the scallop edge border punch.


Here's hoping you have as much fun with your cards and projects! -Kathy

Tuesday, February 14, 2012

Stamp Sets- Fresh Vintage & Rue Des Fleurs


Stamp Sets- Fresh Vintage, Rue Des Fleurs
Cardstock -Naturals Ivory
Dsp- Well Worn
Inks- Early Espresso Classic, Real Red Classic
Ribbon- Crumb Cake Seam Binding
Basic Pearls
Sponges, 1" inch Punch, 1 1/4 inch Punch, Snail, Stampin' Diensionals,

Monday, February 13, 2012

Treat Package Remake - 2


Here's another super-quickie treat package if you've left your Valentine preparations for the last minute (!). I got into my Christmas scraps again and cut some strips 2.25" wide by 6" long. For the inside, I used a scrap of Very Vanilla just slightly smaller to disguise the more "Christmassy" print and to give myself an uncluttered space on which to stamp. I put the two ends of the DSP through the scallop punch, and added holes for a little knot of velvet ribbon (also from the Holiday Mini). Then I glued the vanilla to the DSP.

Inside, I used a combination of stamps from Artistic Etchings, Grateful Greetings (sentiment), and Elements of Style (the "for you" on the outside). My inks were Crumb Cake and Cherry Cobbler, but you can use whatever you have that coordinates with your paper. The Butterfinger heart was heavy enough that I put just a little sticky strip to hold it in place.

Thanks to fellow demo Carol for the idea on this one! -Kathy

Sunday, February 12, 2012

Sale-a-bration Sundays: Love Banner


Since this is the Sunday nearest Valentine's Day, I thought I would show you the banner designed by Lisa & Deb for our January demonstrator meeting. Isn't the Lovely Letters stamp set perfect for this? (I reach for it whenever I want to do a monogram effect.) And notice the little paper roses, made from scallop and circle punches.

Although we won't be making the banner itself in class on April 15, I will be demonstrating how to do the little flowers. What's more, I'll show you how to tie perfectly consistent mini bows every time using a dessert fork! Now how can you resist that?! -Kathy

Wednesday, February 8, 2012

Treat Package Remake - 1


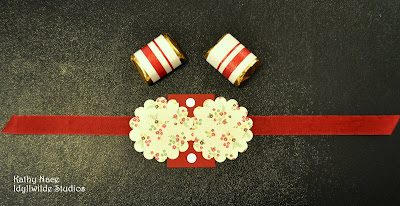
You remember the elegant chocolate treat packages that Lori made up for our Holiday Open House in October? I liked them so well (both aesthetically and actively with my taste buds!) that I decided to do a re-make for Valentine's Day.

It just so happened that I had some scraps of paper left from the Holly Berry Bouquet paper I bought at Christmas. It's all sparkly and eye-catching, just begging to be released from scrap pocket jail! Here's a thrifty tip: When choosing your holiday colors or shopping the after-Christmas sales, red and white patterns such as stripes, checks, plaids and polka dots can extend into Valentines Day and (with the addition of a "true blue" patriotic picnic decor for the summer months.

For each chocolate bundle you'll need:

a cardstock base 1.75" x 2"
two strips of DSP 1" x 3"
two 1 3/4" scallop circle punches of contrasting DSP
about 14" of seam binding tape (the wider/stiffer the ribbon, the longer it needs to be)
Tombow Multi-Purpose glue, clear Scotch tape, and glue dots
two Hershey Nuggets, flavor of choice

1. Wrap the 1x3" strips around the belly of the nuggets and secure on the bottom with tape.
2. Position the scallop circle punches on the base with the side you want to show facing DOWN. Just under half the scallop circle overlaps the base. Secure with Tombow and allow a moment to set up.
3. Position glue dots on base as represented by white dots.
4. Press nuggets onto glue dots as you snuggle them onto the base.
5. Center ribbon/seam binding tape (in this case Cherry Cobbler) beneath base and slowly cinch sides together as you tie your bow.
6. Optional: Of course, if you want to add a little tag or sentiment, our baker's twine and Jewelry Tag punch would tie on perfectly!

They're cute alone, but twice as nice in pairs. Enjoy! -Kathy

Monday, February 6, 2012

I Want It All Occasions Mini Share


You have probably looked through the Occasions Mini catalog by now and fallen in love with the products for yourself. But to help you get your hands on a "little bit of everything" I've put together a collection of lovely things that coordinate with the Attic Boutique Designer Series Paper (pictured lower left). There is coordinating card stock for card bases, ribbon and baker's twine, laser cut cards and envelopes, brads, hat pins, pearls, sparkly paper... even a sticky-back maze game that will make a truly unique card for a kid you know... no matter how old he or she may be!

If this looks like something you'd like to play with, just get in touch with me. It's $13.oo (tax and shipping included). I'll be happy to put a set together for you. -Kathy

Sunday, February 5, 2012

Sale-a-bration Sundays: Kite Card


I am having so much fun with the Sale-a-bration products, I decided to preview a project with you each Sunday through the end of March to get you thinking about some of the things we'll be doing in the class I'm planning for my customers who place a qualifying order ($50) during this SU! promotion.

I'm starting with this adorable kite fold card, spotted on the web site of demo Brenda Quintana. We will definitely be making this one! It will lend itself so well to kid cards and a variety of uplifting themes. It pops open with space for a message inside, as you might imagine. Just think of the fun you could have embellishing the tail... -Kathy

Thursday, February 2, 2012

Love You Truly Card Class


Here's a great basic card class to build your stash! We'll spend a relaxing couple of hours recreating four versatile designs; wedding, anniversary, Valentine’s Day, and “just because”. Two each of 4 card designs will equip you to say it often and well!

Saturday, February 11, 2-4pm. ($12)

Shoot me an e-mail if you'd like to participate! -Kathy

catalina_los_ojos@hotmail.com

Wednesday, February 1, 2012

Furry Folk Valentine


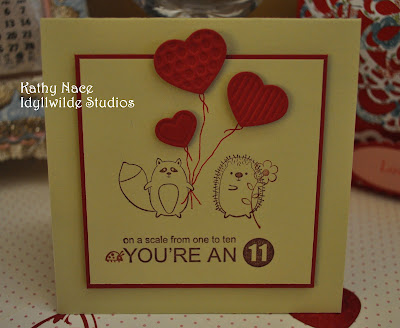
Have you got your Valentines made yet? If not, let me encourage you to consider a non-traditional stamp set! Little animals have cuteness-factor built right in, and when paired with a heart-felt sentiment, they make the perfect image for a variety of occasions!

Furry Folk has lots of little images. If you stamped each individually, it would be pretty involved. The way to speed up production of multiple cards like this is to set up more than one image on your stamp block (another very nice option with the new clear stamps). I paired the two animals, and on another block the flower and ladybug. The sentiment was already a unit. I chose three hearts from the new Fashionable Hearts Embosslit Die, popped them up on dimensionals, and drew the strings on with a Stampin' Write marker.

The card measures 4.25" square, with the panel a 3.75" square (also popped up on dimensionals). I'll hand out most of these personally, but if I need to mail a few, they'll fit in our standard sized envelopes easily. -Kathy