Monday, May 23, 2011

Easter Retrospective


This "Bunny Brigade" marched through my mother's house back about Easter Sunday... she enjoys cute things and making a little something for the grandkids, so I try to come up with some projects we can share. She kept asking where they came from?!

I found some "To Go" drink mix packets you can add to bottled water. We wrapped them in typing paper, then punched out feet and all the rest. You could attach cotton ball tails to the back side. Aren't their expressions hysterical? -Kathy

Wednesday, May 18, 2011

Tiles Two: Another Technique


This series of tiles is created using craft inks and clear embossing powder. The tiles are then baked in the oven - if you try using your embossing gun, it will take you forever and a day, as the tile absorbs and equalizes the heat faster than the embossing powder melts. I was very pleased with the range of color I achieved, the "painterly technique" I tried on the second example, and the fact that this technique works equally well on glazed and unglazed tiles. The first and third examples are 6x6", but the second tile measures 12x12". If you wanted to do coasters, I suggest the 4x4". -Kathy

Monday, May 16, 2011

Olathe Stamp Club - May 2011


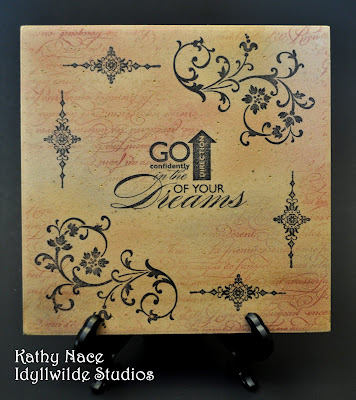
The hostess for this month in Olathe has been waiting since the first of the year to learn this technique! We stamped on 6x6" tiles with a permanent ink and then added color with chalk pastels. I also pioneered a new technique that I haven't seen elsewhere using the amazing Versamark ink to create subtle background images. Of course we sealed everything to protect the pastels. This is a very effective approach - those of you who have visited the studio know that there is a row of tiles created in just this way that are installed in the shower at about head height (didn't want them exposed to TOO much water and cleanser). They're holding up fine, and all without baking or other heroic measures.

The first tile had some amazing texture and color variations, which I tried to incorporate into the design. The second and third were very plain to begin (although they did have some dirt stains that wouldn't come out - I stamped right over them!), so all the color you see has been added with the pastels.

I'll be posting a few more examples of tile art soon - it's such fun that it's addictive, especially when you shop for your tiles at the Habitat ReStore. Tiles for just 25 cents! What a great hostess gift, whether as a trivet, or a presentation base for a bottle of wine or a candle. These also make nice pieces of semi-permanent artwork when displayed on an easel. -Kathy

Wednesday, May 11, 2011

Mortarboard Gift Card


Seems like they come in waves: babies, weddings, graduations... This year is one of those graduation waves in my world. I've seen this little card on several sites and made my own modifications. It always gets good reviews from folks who see it up-close-and-personal, so I am making them en masse and simply changing out the colored card stock to represent the school colors for each recipient. The mini tassels are a craft store find; buttons from my stash attached with pop-up glue dots, which also hold the tassel in place.

The inside pocket can contain cash/check, gift card, or even the graduates' information if you want to use them as announcements.


Want to learn how to make them yourself? I'll be demonstrating this project at work night in the studio on May 19. Come join in the fun!
-Kathy
Monday, May 9, 2011

Lawrence Stamp Club - May 2011


Of course we had to do something with flowers! I got to pick the topic this month, and I chose to use the gorgeous new "Flower Garden" embossing folder from the summer mini catalog, paired with the faux mother-of-pearl technique and a little trick we've used before about adding color to the embossing plate itself... Despite the number of techniques layered together, it was still a quick card!

Sentiments are from the Word Play set, which I've been drooling over for months now. Patience has its rewards! ;o) Inside, it says "Worth the Wait". I thought this would make a nice wedding OR anniversary card. -Kathy

Thursday, May 5, 2011

Organization: Stamp Index


Hi friends. I thought I'd share a quick idea today about keeping your stamps together. If you're still working with the wood mounted sets, take just a moment before assembling to photocopy the sheet of decals. Trim it and adhere to the inside of your case with snail adhesive or glue dots. This way, when you're working with friends or cleaning your space in a hurry, you have a visual reference so that you know exactly what stamp goes in what case! Much easier than having to find it in the catalog to doublecheck...

Of course, if you've transferred your allegiance to the clear mounted stamps, there is already a visual index on both front and spine. Now isn't that convenient?! -Kathy

Wednesday, May 4, 2011

Waterfall Bear


When I was preparing for the April stamp club in Olathe, I kept thinking of all the great waterfall cards I could make with this or that stamp set. I'm stashing this one in my birthday card box for my brother, whose birthday is on the 4th of July - I know I won't have time to make it then! I've just collage stamped images from Under the Stars for my background paper, and I'll add a note at the top of the pull tab something to the effect "Hope your birthday is..."

Included a couple of shots of what the card looks like as you keep pulling, but really, you need to see it work. If you haven't, drop in at a work night sometime and I'll show you how it goes. -Kathy

Monday, May 2, 2011

New Catalog and Carryover Flyer


Click on Catalog to See all the New Products!

Did you forget to order something from the last Mini Catalog?
Click to see if Stampin' Up! still has it in stock!

Pocket Silhouettes


As promised, here are a couple more examples of how you might use Pocket Silhouettes. As you can see, the images can easily be featured individually or in a group, and lend themselves to unlimited color combinations (although I must confess that Not Quite Navy with Old Olive is my personal favorite). Both use ribbon in a very similar way, but it's interesting how different the overall look can be.

Thanks to fellow demo Lisa for prepping the pieces for the second card design as we worked with this set one afternoon. -Kathy