Showing posts with label Christmas. Show all posts

Friday, August 24, 2012

Christmas in August


Hello again,
I created this card for our annual "Cool 'n the Gang" all day stamp extravaganza!  Oh my, and what a day it was!  Lots of fun, great projects and yummie food!  What more could you ask for!?!  Hope you like!

Thanks,
M.

Materials:
Card Stock: Real Red, Whisper White, Island Indigo, and Summer Smootches DSP.
Stamp Set: Scentsational Season.
Ink: Island Indigo.
Punch/Dies: Dotted Scallop Ribbon Border and Holiday Collection.
Embossing Folder: Perfect Polka Dots.
Ribbon: Real Red Polka Dot Grosgrain (Ret.).
Misc.: Clear Embossing Power and Stampin' Dimensionals.

Monday, December 5, 2011

Stamp Club Lawrence - December 2011


This is such a creative use of Pocket Silhouettes! And of course I always like the fresh look of a "clean & simple" approach. I CASEd and tweaked from something I saw on Joanne Friend's post on our demonstrator web site. The sentiment from Welcome Christmas was perfect, suggesting a medallion with a single, simple impression. Cherry Cobbler has become my favorite color this year, but even if that weren't so a simple knot of the scallop dots ribbon gives the composition "pop".

I hope you can find simple solutions to your many tasks in the coming days. -Kathy

Thursday, December 1, 2011

Festival of Trees - Auction

Thank you to my faithful and generous club members who gave their time and skill in helping me create the decorations for our tree, and to my husband Mark who helped me haul it to the display site. I am thrilled to report that our efforts brought $500 dollars to the total of nearly $38,000 raised to benefit The Shelter, Inc. As a former foster parent, I am thrilled to be able to help maintain the existence of a safe place for kids who have to be removed from their homes suddenly and often without basic necessities.

May it one day become unnecessary. -Kathy

Sunday, November 27, 2011

Festival of Trees 2011 - Schedule


Want to reclaim that sense of childhood wonder for just a bit? Get yourself to the Lawrence Festival of Trees! Located in the historic former Opera House (now Liberty Hall, 642 Massachusetts in downtown Lawrence), the darkened auditorium absolutely sparkles with all manner of visual sugarplums. Admission is just $3 (kids are free) and there are 56 trees to inspire you, from our traditional sparkling snow-in-the-forest look to a mosaic from broken dishes, a tree made from retired street light globes, a moving sculpture tree, a tree of stars, and many themes in all colors - plus 25 wreaths/small objects! I could hardly bear to leave when set-up was done, I just wanted to sit down in the middle of it all and soak it in.

Viewing:
Monday, November 28 10am-8:30pm
Tuesday, November 29 10am-5pm
Wednesday, November 30 10am-8:30pm
Thursday, December 1 10am-8:30pm

Auction:
Tuesday, November 29 7:30pm
(admission $35-50, I have two free passes to share if you want to see what our tree brings and report on it! We're #15)

Proceeds from auction and viewing benefit The Shelter, Inc., which provides emergency services for youth in the Lawrence community.

And don't forget the traditional Old-Fashioned Christmas Parade, Saturday December 3, 11:00am. Owners of antique horse-drawn conveyances from as far away as Texas bring their decorated horses and buggies along with costumes for themselves. Such a charming tradition and a great way to get in the mood! -Kathy

Festival of Trees 2011 - Folded German Bells


I know you've been wondering what our folded German bell ornaments would look like. I finally finished them last night as I was working on our Festival of Trees Entry, so here's a close-up, all painted and accented with ivy and berries. Let this be a lesson to you skeptics who thought yours wouldn't look good...! They were the perfect contrast in shape and size to the petal cones we made first.

Apologies to the Olathe gals, I managed to forget the materials we needed so they didn't make bells. However, you can find the instructions at http://www.allthingspaper.net/2009/12/folded-german-bell-tutorial.html and make your own! We used 6x6" squares of DSP, which I then spray painted a pale green. -Kathy

Monday, November 7, 2011

Pretty Cute Packaging!


Look what's under the tree! Have you noticed those little craft-colored fold-up boxes in the holiday mini catalog? They are one of my current favorite products! They are just the right size for a stack of gourmet cookies or homemade candies, 4 scented votives, a squatty jar of preserves, and... But wait! I can't tell you yet what's in mine, it's top secret!! But I WILL tell you how I put together the wrap.

Fold up one of those cute little boxes (they come 4/pack for less than $1 each). Cut a 2x12" strip of card stock and wrap around the box (won't quite meet on the bottom, but who's looking?!). Rip a strip of fabric 1" wide and tie around the box with a double knot (this happens to be from our holiday set so it coordinates perfectly with the DSP I used on the tags). Stamp your sentiment and punch out w/ the 2 3/8" scallop circle punch; sponge edges. Punch out a background circle of DSP with the 2 1/2" circle punch. Glue these two together, then punch a 1/8" hole at the top. Thread a double thickness of baker's twine through the hole, and tie onto the fabric knot.

Ta Da! Super simple. Don't you wish all your gift wrapping could be so painless?
-Kathy

All supplies Stampin' Up!

Stamps:
Delightful Dozen
Ink:
Cherry Cobbler classic
Paper:
Naturals Ivory and Early Espresso CS; Holly Berry Bouquet DSP
Accessories:
Holly Berry Bouquet Designer fabric; 1/8" handheld, 2 3/8" scallop circle, and 2 1/2" circle punches; sponge; Tombow MultiPupose liquid glue; Cherry Cobbler baker's twine

Friday, December 31, 2010

December 2010 Olathe Stamp Club


I love teaching. I always learn so much as I'm preparing projects for others, and there's nothing that makes me feel alive like learning something new!

I'd been hearing about "easel cards" for awhile, so I decided to teach it in order to learn it. There are two ways to construct an easel card; in one method you use a single strip of paper, and in the other, the front piece attaches separately (this version gives you the option of slightly larger cards). They lay flat for mailing, then prop themselves up for viewing like an artist's easel (see second photo).

The first sample I created features a photograph on the front panel, in honor of my mother-in-law, who has been in the hospital since before Thanksgiving. I wanted to create something for her bedside table that would bring to mind a fond memory and create a sense of hope. The second sample is a simple Christmas card. Don't the polka dots create a fun feeling of snowfall?! And I love the way that combining stamp sets allowed us to make the inside seem like a "close-up" of the card cover.
-Kathy

Monday, November 22, 2010

Candy Cane Christmas


I owe thanks to two fellow demos for this post: The card was designed by Kirstin Randazzo, the coaster by Lisa Cool. I thought they made a perfect pair!

To make the card, we embossed a standard-sized Baja Breeze base with the Northern Flurry folder, then grouped a series of assorted size circle punches (from the Candy Cane Christmas DSP) and a bird stamped with the Punch Potpourri hostess set. Several of the circles are popped up on dimensionals for interest.

The coasters are a cinch to make! Can't you imagine a set of four using those coordinating fabrics? We just placed a layer of Candy Cane Christmas fabric, a layer of quilt batting, and another layer of fabric together on the Scallop Square die, and ran it through the Big Shot all at the same time! Just 4-5 stitches (like a tied quilt), a Big Designer Button and a snowflake cut from felt (the Northern Frost decorative strip die is perfect), and you're done.

Great gift idea for a neighbor or office mate, don't you think?! -Kathy

Monday, November 1, 2010

Karen's Cardinal Christmas


Here's a darling little 3x6"card from a fellow demo whose work has been featured here before, Karen Herrmann. Karen has used Cherry Cobbler as her base with texture from the Sanded background inked with Cherry Cobbler ink and Concord Crush from the Patterns Designer Series Paper Stack (In-Color) for interest on the top of the card. The Concord Crush Stitched Poly ribbon is also from the In-color family. A simple image from A Flower for All Seasons is watercolored with Cherry Cobbler, Always Artichoke and Concord Crush ink to pull it all together and create a focal point, and of course the sentiment is snitched from A Cardinal Christmas. The Scallop Rectangle Clearlits sizzlet (pg 211) was used to cut around the image after it was watercolored.

Wouldn't you just love to set this next to a great, big poinsettia in your house?! If I were feeling really generous, I might even send it to a friend... -Kathy

Friday, October 22, 2010

New Twist on Ribbon


This card started with the ribbon. I absolutely love-Love-LOVE this wide striped grosgrain because it's such a strong partner anywhere you use it. I wanted to feature it in a way I hadn't seen before, so I was messing around and I came up with this... and of course, the ribbon* set the color scheme for the card, then I added some of that wonderful old-fashioned "Newsprint" DSP, and then I had to repeat the red and black to tie it all together, and I was thinking about favorite Christmas movies and tunes (White Christmas with Bing Crosby and Danny Kaye. The scene where those two are impersonating a pair of sisters is so funny even they have a hard time getting through it!)... and there it was. You could easily stamp a sentiment, punch it out, and pop it up on some dimensionals to tack onto the upper left corner of the skater square if you wished.

*Hindsight is 20/20: If making it again, I would tuck the raw edge of the ribbon at the top of the card under the panel of DSP to conceal it, rather than pulling it up and over to the back of the card, where it shows... -Kathy


Stamps-
Winter Post

Ink-
Real Red classic

Paper-
Real Red and Naturals Ivory CS; Newsprint DSP

Accessories-
Photo Corner punch; 1/8" black taffeta & 1 1/4" Real Red Striped grosgrain ribbon
; Tombow Multi-Purpose adhesive

Wednesday, October 20, 2010

Twilight Snow


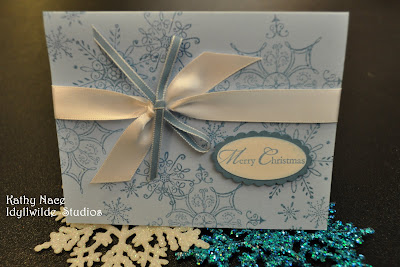
Although I stamped this card, it was designed for a swap by fellow demo Lisa, whose work I've showcased before. It's one of those beautifully simple cards that would be perfect for mass production! Just one color of ink, collage stamping for carefree placement, and a unique twist by simply tying the narrow blue ribbon on top of the white satin ribbon. The sentiment requires a quick stamp and two punches, and ta da! Ready to mail! -Kathy

P.S. All supplies Stampin' Up!, of course!

Monday, October 18, 2010

Deck the Halls with Joy

I fell for the Deck the Halls Christmas paper in the holiday mini catalog in one glance! Cutting into it was another matter... it's even more beautiful in real life! (Check out the one behind the card, won't that make a stunning background for a piece of photo wall art or a scrap book page?!) But I finally found my courage, and here's the result...

Because I wanted the focus to be on the paper, I chose a simple layout in "thirds". I applied the eyelet punch to the layered strips at the bottom, and tied a piece of Cherry Cobbler 1/2" Seam Binding around the line where the papers meet, leaving enough for a big, loopy bow. Let me just say, expect to see a LOT of this seam binding on projects this year! The color is yummy, and it performs SO well - it's soft enough to tie and hold a know, but retains its shape well. Finally, I stamped the sentiment from Welcome Christmas and cut it out, then backed it with Always Artichoke and cut it out again.
A couple of Stampin' Dimensionals on the back, and voila! The layout may be super simple, but the use of the DSP in multiple patterns and colors adds all the interest needed.

I thought it was a good reminder, as well: As I'm starting to plan for a busy holiday season, I first want to deck my halls with joy. -Kathy


Stamps-Welcome Christmas
Inks- Cherry Cobbler classic
Paper- Naturals Ivory CS; Deck the Halls DSP
Accessories- 1/2" Cherry Cobbler Seam Binding; Stampin' Dimensionals

Wednesday, September 22, 2010

Christmas is Coming...


I hate to be the one to tell you this, but it's time to get serious about those holiday gifts and greetings! Monique sneaked in a couple of ideas way back in July (did you catch them?!), just to light a spark, but we'll be posting from here on out with increasing frequency as we collect ideas to spark your creativity.


To ease you into the mode, I want to continue the recent theme of "switching up" a good design from one purpose to another. When I conceptualized this card, I was thinking of 1940s aprons and tablecloths, can you tell?! I began with pair of returning color favorites, Baja Breeze and Pink Pirouette. And then, because I just love it, I added the shimmery Presto Patterns DSP, cut with the Big Shot using our Top Note die. I stamped and "stamped off" several times on the pattern paper, then added additional color by sponging, pulling in a little olive.


Next I chose a sentiment and stamped repeatedly on the base for visual interest (and to reinforce the message), then glued down the DSP. Digging out a bunch of white scraps, I made the flowers. Those two-step stamps are such fun! And being me, I sat and reveled in cutting out every last one of them. My first grade teacher would be so proud! I also cut a few little leaves with the Big Shot to combine with the flowers. I grouped these in one corner, popping some of them up on dimensionals, and interspersed some leaves.

Finally, I stamped a sentiment to go opposite the flowers. In the first instance I gave it visual weight by gathering ribbon onto the back of the oval (which I edged in sticky strip), and attaching a red button. On the Christmas version, I simply used Riding Hood Red for the sentiment and the matting, since a strong color calls attention to itself and has "visual weight".

Now, I admit this card is not suitable for mass production, but it's a great idea for a grandma, aunt, or any special person who appreciates vintage linens. And the beauty of it is that as you're producing, you can make a couple for both your birthday and your holiday card stashes! Kathy

Stamps:
Greenhouse Garden, Elements of Style, Grateful Greetings
Inks:
Baja Breeze, Pink Pirouette, Riding Hood Red, Old Olive
Paper:
Baja Breeze
, Old Olive, Riding Hood Red, Whisper White CS; Presto Patterns DSP
Accessories:
Little Leaves Sizzlet, Top Note die, Stampin' Dimensionals (vintage button and seam binding)

Saturday, July 17, 2010

Happy Holidays


This card was also for this weeks Demo meeting. Our pre-made swap challenge was a Christmas design. Christmas in July...? I know, it feels like 110 degrees outside who's thinking of Christmas right? ...all those early birds that we're secretly jealous of, when December rolls around and we wonder how and the heck we're going to find time to send Christmas cards, much less make them! Oh to dream! :) But seriously, I have gotten a sneak peek at the Stampin' Up! Christmas Mini Catalog and you're in for a treat! Lot's of new great stuff coming your way so start pinching those pennies and tucking 'em away!
ttys,
Monique

Materials: All materials are Stampin' Up!
Paper: Old Olive, Chocolate Chip, Whisper White, and Old Olive DSP.
Ink: Chocolate Chip, Riding Hood Red, and Old Olive.
Stamps: Four the Holidays and Patterned Pines.
Punches: Eyelet Border.
Ribbon: Riding Hood Red.
Misc.: Stampin' Dimensionals and Silver Brads.

Saturday, July 10, 2010

Christmas in July

Our challenge this month for the Topeka Area Demo meeting was to create a card using non-traditional Christmas colors and this is what I came up with. I got my inspiration from 'sam2001'. Hope you like!
Monique

Materials: All materials are Stampin' Up.
Paper: Baja Breeze, Pear Pizzaz, Chocolate Chip, and Whisper White.
Ink: Baja Breeze, Pear Pizzaz, Chocolate Chip, and Versa Mark.
Stamp: Tree Trimmings and So Swirly wheel.
Ribbon: Baja Breeze.
Misc.: Stampin' Dimensionals and Sticky Back Rhinestones.

Saturday, December 26, 2009

Mice Treats


Materials: All materials are Stampin' Up! unless otherwise noted.
Paper: Whisper White and Summer Sun.
Ink: Real Red and Versa Mark.
Stamps: Best of Cluck and Winter Post.
Punch: Boho Blossom and Circle Scallop.
Ribbon: Red Gingham.
Misc.: Oreo, Chocolate Covered Cherry (with stem), Chocolate Kiss, Colored Frosting, Mousetrap and Curling Ribbon (non-Stampin' Up!).

Stinkin' Cute! That pretty much sums it up! Aren't these little guys so much fun! I wish I could claim the mouse treat idea as my own, but unfortunately it's not. Not sure where it originated but I 'cased' it from a reception we had at my church a couple weeks ago knowing I had to make it for the "Cool n' the Gang" girls.

So, not sure how I was going to package him up, I was trying to figure out how I picture mice when I think of them, and other then in heaven from a tasty meal of Decon, you guessed it, mouse traps! So after messing with it for a little bit, I noticed that the Oreo cookie fit perfectly on the end of the trap wedged in between the spring and the locking bar. Then I added a little ribbon and bow to dress him up and gave him a little cheese treat and voila!
Disclaimer: No mice were harmed or otherwise mistreated in the making of this blog... but a few were eaten! :)

Hope you all had a Merry Christmas!
Monique.


Friday, December 25, 2009

Make Merry!


Materials: All materials are Stampin' Up!
Paper: Whisper White, Certainly Celery and Soft Suede.
Ink: Certainly Celery, Soft Suede and Real Red.
Stamps: Berry Christmas.
Punches: 1/2" Circle.
Ribbon: Polka-Dot Grosgrain Ribbon 3/4".

Hello there,
This cute card also comes by way of the Stampin' Up Regional in Wichita. Except, it wasn't a swap but a card we as Demonstrators got to make. This set is only available for a short while longer (Jan. 4th) in the Stampin' Up! Holiday Mini. A quick and easy way to add color/texture to a card is to of course, add ribbon, and what a treat you get with this one as it's double sided. White stitched edging on one side and polka-dotted on the other. It's like two rolls for the price of one! Can't beat that! We also stamped a wreath on the envelope, always a nice way to let the recipient start appreciating the card even before it's open.

Thanks for visiting!
I hope you all have a very Merry Christmas!
Blessings,
Monique.

Tuesday, December 22, 2009

A Cardinal Christmas Set Sampler - Post Card


Here's a quickie I designed for our "Christmas in July Stamp-a-Stack" just right for those of you who want to use the laser printer for your holiday message! Stampin' Up Whisper White and Very Vanilla will go through just about any printer, and if you have a way to feed straight through (without the rollers having to pull the paper around a roller) you can use the heavier weight naturals or colors for your project.

As you're setting up your message side, remember to leave room for an address! Once you've printed what you want, cut the card stock into quarters and stamp. This design uses the "ghost stamping" technique for a little added depth and interest (stamp fully inked, then stamp again without re-inking). I've also used the 1/4" punch for the red "berries" or faux brads... just attach with a dot of glue then add a dot of Crystal Effects on top and allow to dry.

No extra postage required!

Kathy


All Supplies Stampin' Up!

Paper: Naturals White CS (real red scraps)
Stamps: A Cardinal Christmas
Inks: Real Red, Always Artichoke classic
Accessories: 1/4" hand held punch, Crystal Effects

Monday, December 21, 2009

A Cardinal Christmas Set Sampler - Note Pad/Planner


In our next set sampler adventure, I want to introduce you to a group of images that's perfect not just for Christmas, but for bird and nature lovers in all seasons. It's called "A Cardinal Christmas", and for the next four days I'll be showing you a variety of projects made primarily with this set. I'll begin with one of my favorite things, a holiday organizer.

You can probably tell that I haunt the $ bins in various locations. The trick is to add that special handmade touch that takes your project out of the common way. When you add a cover and a pocket to this pad, you have a place for coupons if it's a grocery list; a place for stamps if it's a list of folks to whom you want to send Christmas cards; or a place for receipts in case of return if it's your gift list. I'm sure the possibilities are much more varied than my short list, but you get the idea.

The cover takes a single sheet of 8.5x11 card stock. Turn it on the horizontal, and trim it to the same height as your note pad. Beginning on the right, measure the width of the pad, and score a top-to-bottom line into your card stock measuring from the right edge. Now measure the thickness of the pad (the fingernail marker system is just fine!), and score a second line that distance from the first line. Finally, score a third line that represents the width of the pad (this is the top cover) once again. The left-over folds under, creating your pocket and a nice sturdy edge for your notebook. Use Sticky Strip to secure the pocket flap at top and bottom.

I heat embossed the cardinals onto naturals white CS and colored with an Aquapainter filled with denatured alcohol for clear, vivid color.

Don't forget to sign your name on the back - you've just created a work of art!

Kathy


All Supplies Stampin' Up! unless otherwise noted.

Paper: Real Red, Sage Shadow, Basic Black, Naturals White CS
Ink: Real Red, Sage Shadow classic; Black Craft or Versamark for embossing
Stamps: A Cardinal Christmas, Baroque Motifs (for you, Michelle!)
Accessories: (Note pad from local retailer) Sticky Strip, Tombow Multi-Purpose glue, Black embossing powder, Aqua Painter, Stampin' Dimensionals

Saturday, December 19, 2009

Tree Trimming Merry Christmas

Materials: All materials are Stampin' Up!
Paper: Very Vanilla and Soft Suede.
Ink: Soft Suede.
Stamps: Tree Trimmings and Christmas Greetings.
Misc.: Petals-A-Plenty Embossing Folder.

Good morning,
This is another Wichita Regional swap created by Sandy Appelhans. I have to say it's probably my very favorite out of all that I received. It's so simple, yet so elegant. Soft Suede would be the last color I'd go to when thinking of Christmas ornaments but it's absolutely beautiful! The sliver of Soft Suede frames up the very vanilla nicely and makes the embossing pop. Great job Sandy and thanks for the swap!
Monique